Open Studio

clips and tips from the largest, most prolific community television studios on the planet: manhattan neighborhood network

Friday, May 11, 2012

DOCUMENTARY EDITING SEMINAR

TO SEE THE VIDEO GO TO dvtv.blogspot.com ........................................
we apologise for the obvious formatting problems on this blog............................

many of you at the seminar wednesday requested a copy of the PowerPoint Presentation. see below even better, i will be posting a video of the seminar sometime tonight. watch this space... DOCUMENTARY EDITING SEMINAR NOTES you must be: ruthless highly selective always looking for links pictures sounds words: dialogue, narration, text on screen editing is organizing all your material into the most potent message asked Michelangelo how he sculpts – he said the form is already in the stone- all he does is take away everything that isn’t the form. you have to take away everything that isn’t a great documentary a box of tapes or a drive (s) full of files catalog everything. don’t put it off. start a system – stick with it. shooter should label tapes, files. remember when you import into fcp – date of import transcripts. Logs get someone to transcribe. log it yourself. dvd window dubs - one per reel (or 1 hr. max.) number each reel and dvd same if you acquire footage, keep track from where capture/ transfer everything at once know what you capture and where the log, transcript, and dvd is. keep clips under 5 minutes. with hd - avchd files blossom should you capture everything? when in doubt – capture it. takes more time to go back listen for sound effects, atmosphere/nat. sound listen for emotion sounds look for cutaways, reactions, close-ups, details, note where be relaxed and comfortable when you log – don’t miss anything my rule – don’t rule anything out until you know why – everything on the table… read transcripts after you log – listen to what voices are saying – what story are they telling – painting a picture – connecting a to b? be open - see links – listen to the sounds: sound effects, atmosphere/nat. sound listen for emotion sounds look for cutaways, reactions, close-ups, details, note where if no direction…look at the evidence consider what a good detective does… way too many documentaries being made today - yours better be good worse: most people will see your documentary on a computer or on tv or on god forbid a phone even full-time film critics watch more on small screen than theatrical say everything three times! best comprehension – theatre 60% average viewer. your job is to make them bloody care make them feel you are an artist working with one of the most powerful medium known objective or not? every doc is a statement, no statement is completely objective difficult to be objective about something you feel passionate about making a doc- you cannot rely on mnn or any one institution… consider a news story :45 second documentary fatal car crash in queens skid marks, car wreck behind police tape, twisted steering wheel through broken windshield, cops taking measurements, concerned onlookers, residents saying they drive too fast, they ignore the lights. sound advances the story – voices - reporter, police, eyewitnesses, and neighbors always. cut. sound. first. listen - close your eyes speak to the world, not just your community don't preach to the converted you are making your doc for people who don't care - your job: make them care get their attention - every scene rearrange – for clarity – (then) impact and dramatic timing. more flow – easier to understand arranging clips – focuses that material not one voice but many – builds – reinforces be open – look, listen for links more you edit – better you shoot if no direction…look at the evidence consider what a good detective does…

Wednesday, December 21, 2011

Free: Soundcraft Guide To Mixing

Soundcraft has a great 32 page booklet on audio mixing available here as a downloadable pdf.
they also have the same guide available as an i Phone app, but that will cost you 3 bucks.


ACOUSTiC GUiTAR
• Use the best mic that you can, preferably a condenser type.
• For a natural tone, position the mic between 12-18ins from the
guitar, aiming at where the neck joins the body.
• If recording in stereo, point a second mic towards the centre of
the neck, about 12-18ins from the instrument.
• Acoustic guitars sound best in slightly live rooms, if necessary
place a piece of acoustically reflective board beneath the player.

Saturday, July 02, 2011

FCP X: TERMINAL?

i have never owned a PC. never.

two decades ago i switched directly from Commodore Amiga computers to Macs because Macs were the only platform that gave me pro video capabilities. (in those dark days, pro video software - Avid, Premiere and Media 100 - could not even run on a PC.)

ten years later, Apple introduced Final Cut Pro. as an editor, i was really attracted to some innovative features that other programs did not have, and: it was cheaper and sexier than the others.

Apple developed FCP into a full featured production suite which satisfied most any professional need, and continued to innovate and expand the product line so that any serious editor using FCP would stick with it, and invest in Apple hardware as well.

so for the past decade, i have continued to buy upgrades and invest in "muscle car" Macs. my system cost about $11,000, the Final Cut Studio software was $1,300. practically every project i have edited for the past decade has been on FCP including a feature length documentary (which won several awards, thank you).

like many others, i have been waiting for the new FCP release for two years now. (i was ready to plunk down the cash for it this past paycheck.)
Apple blew it. the new FCP X is severely limited when compared to Final Cut Studio, and it cuts off many work flows which are standard operating procedure in this business. for instance, FCP X can't capture or output to tape without some third-party workarounds. (yes, i KNOW videotape is dead. try telling that to a client on a deadline who is waiting to deliver - get this - a finished HDCAM videotape.)

worse news is that FCP X is completely incompatible with any existing FCP project. if you started a project in FCP 7, FCP X won't open it. Apple has eliminated the EDL (edit decision list, an ancient but ubiquitous file format containing every in and out point of every edit on the timeline) or any ability to export files to Avid, or Pro Tools, etc.

for many people who edit weddings, for instance, FCP X will be great. if the project is imported and outputted on the same system, fine. but for anyone who has had to work with an audio house, or work with other editors or even other editing platforms (meaning almost all professional editors) FCP X STINKS.
the other limitations have been well documented here and here.

every other pro editor i have spoken to is now considering Avid, and wondering why we should pay a premium for Apple's hardware when PC platforms are so much cheaper.

i once worked for Panasonic selling pro gear to broadcast clients, and someone in the company gave me some perspective: "sure, Sony and Panasonic make a profit with the broadcast gear, but it is pennies compared to what they make with consumer gadgets". Apple gets this logic, and maybe they have decided that all the coding and development and third party integration just ain't worth it compared to the massive profitability from ipads and iphones.

Apple, it seems, is abandoning the professional and broadcast market, and after years of investing time, money, and infrastructure in Apple - we are PISSED. unless they fix this FAST - professionals will abandon Apple - forever.

PC's aren't sexy, but we got deadlines. jobless ain't sexy neither.

Richard Speziale

Monday, April 25, 2011

3 - Point Light Notes


click HERE to download Arri Lighting Handbook


There is a myth that has been viral since before the dawn of digital video. The myth goes something like this: since cameras are so sophisticated today, and so light sensitive, and since you can fix anything in post-production, the lighting doesn’t matter anymore in video. Don’t you believe it, though.
Consider a video picture, or any other picture for that matter, consists of three things:
a)•light,
b)•dark (absence of light) and
c)•color (tinted light).
That’s all a picture is, just light. To say the lighting is irrelevant is to deny the artist a vital - and powerful communications tool.
Cameras today are incredibly sophisticated and light sensitive, and can yield exceptionally beautiful pictures with available light.
Because Manhattan is an urban environment, most available light indoors stinks for video. Typically, the light is from directly above, causing glowing foreheads and deep, dark eye sockets. Without supplemental lighting, your location videos can look pretty grim.
In nature available light can be fickle, and can change in an instant. This is why movie crews that you see on the street have huge lights set up in broad daylight – if the sun goes away, they can bring it back with a 50,000 watts and an amber gel.

Three point light attempts to simulate the three-dimensional world on a two-dimensional medium, such as a canvas, a photo print, a movie or video screen. It is the basis of all film television and photography lighting. The fundamentals of three-point light are evident in many renaissance-era paintings (and in some earlier examples from ancient Rome, Greece and Egypt.) The ‘masters of light’: Vermeer, Caravaggio, DaVinci, etc. understood how capturing the light could make an image pop right out of a canvas with dramatic realism, and how light could bring their often plain-looking subjects to life.

Remember, there is no one-size-fits-every-situation solution or formula, just general principles and guidelines. Every shoot is different, every face is different, and therefore every lighting situation is unique. The way a scene is lit can sometimes communicate as much as the dialogue - often this is the case in both Hollywood drama and daytime television drama.
The image captured by the camera is influenced by not only the lights but also by the camera’s iris, shutter speed, gain settings, etc. here’s a quick and dirty guide to where to set them:
• Iris: close down the iris until all of the faces in the frame are not overexposed. When in doubt, underexpose a little.
• Shutter Speed: always at 60, unless you are shooting a hockey game.
• Gain: should be as low as possible, as more gain adds grain and degrades colors (0db is normal, +16db is high). Low gain requires more light. As in nature and traditional photography, more light results in more vivid colors (this is why painters want a studio with great light). Many videographers prefer to shoot at -3db to get extra-stable color.
• White Balance: always set the white balance to the light that is falling on the subject’s face. I sometimes use the presets, tungsten or fluorescent, when appropriate.


Key Light: main light that falls on a subject. Key light is sometimes the strongest light source, but by definition it must be stronger than the fill light. The key light is the one that sets the character of the lighting design. This is the light that will literally highlight your subject’s features. Often key light is used for dramatic effect; for instance a key light from below gives an unnatural, mysterious or other-worldly look and has been utilized in crime, horror and fantasy films since the silent era.
A key light is typically hung approximately 30 degrees above the subject’s eye level, and anywhere from ten degrees to 90 degrees to one side (though thirty degrees off axis is a typical portrait lighting setup).
A key light needs to be somewhere off-axis with the camera, otherwise the light becomes very flat, with harsh shadows right under the nose and chin, similar to flash-photo lighting.
When possible, the light source is controlled with barn doors, which can help put light exclusively on your subject, and can keep light off any walls or objects in the background.
A key light can be focused light directly from the lamp or instrument, but portrait and video lighting often employs diffusion, reflected light, and bounced light to spread the light source, resulting in a ‘softer’ light falling on the subject.
Diffusion is achieved with frosted gels or ‘spun’ fabric gels attached to the instrument’s barn doors with wooden clothespins. These gels will cut down the effective light being delivered to the subject. Each gel has a value such as 1/8, ¼ or ½, referring to the amount of light the gel can be expected to lose.
Reflected light is usually achieved with umbrellas or other specialized reflectors. Umbrellas, because of their parabolic shape, focus the reflected light on a subject. Lowell lights are built with a mount for their ultra-lightweight umbrellas.
Folding reflectors, typically 12” to 36” discs with changeable lightweight skins that can be reversed, for varying degrees and qualities of reflection.
Bounced light is achieved with a large white card (usually foam core or ‘gatorboard’) or by merely aiming the light at a white wall or ceiling. This gives an exceptionally flat or even lighting to an entire room (though without the ability to really control where the light falls – it falls everywhere!
This method is particularly effective in small rooms where setting up three light stands would be impossible.)

Fill Light: this light, coming from a different angle, will fill in the dark shadows in the areas not covered by the key light. The fill light is by definition somewhat weaker than the key light, and a lower-wattage instrument may be used. For a portrait or beauty shoot, the fill light is typically positioned somewhat lower than the key light, anywhere from eye level to about twenty degrees above. The fill also needs to be on the opposite side of the key light; if the key is on the right, the fill needs to be on the left.
Colored gels can add subtle effects when used on fill lights.

Back Light: this is the light that falls on the subject’s hair and shoulders, and is important in giving a two-dimensional television picture a pronounced third dimension. Backlight is also frequently used to accent hair. When a subject with black hair is wearing a black suit against a black curtain, backlight will separate Roy Orbison’s hair and suit from the curtain.
The Backlight is typically at a forty-five degree angle above the subject’s head. Fashion shoots sometimes position a backlight directly in back of a model, below the head, to give a dramatic halo to a hairstyle.
Colored gels on backlights are effective tools in setting mood. Blue is often used to simulate moonlight (even though moonlight is actually more sepia colored); other gels can simulate sunlight or urban streetlamps.

Monday, April 26, 2010

2 FREE SEMINARS!

MNN SEMINAR


FIRST FILMS 1894-1906 NEW YORK-PARIS

See the earliest motion pictures ever made in a program covering the first
dozen years of US and European film production.
Included in the screening: the first advertising film, the first film with
staged action, the first close-up (not Griffith!), early documentaries,
pioneering special effects and fantasy films with stunning hand-tinted
color, and exclusive views of nineteenth century New York and Paris.
Witness the birth of a pervasive new art form that was soon to conquer the
globe.
NEW for this screening: MORE early Manhattan films.

FREE Tuesday, May 4, 2010 7:30pm
MNN 537 West 59th Street • Open Studio
Reservations Required: diana@mnn.org • 212 757-2670 x312
++++++++++++++++++++++++++++++++++++


MNN SEMINAR


PHOTOSHOP BASICS

Get started on the most popular - and most sophisticated -image
manipulation software on earth. This seminar will introduce you to all the
tools, how to use levels, correct image mistakes and to combine multiple
images.

FREE Monday, May 3, 2010 6:30pm
MNN 537 West 59th Street • Open Studio
Reservations Required: diana@mnn.org • 212 757-2670 x312

Wednesday, January 20, 2010


using free software - a quick and easy way to post high quality videos of your entire show on the internet.

during this seminar a 28 minute show will be encoded from a dvd and posted on the net.

also: details of how to capture a program from dvd with optimized settings for imovie or Final Cur Pro.

this seminar is for producers who do not have DVcam or miniDV equipment at home.

wednesday, january 27th
registration required
diana@mnn.org
212 757-2670 ext312

Wednesday, December 16, 2009

Three Point Lighting Seminar Notes


click HERE to download Arri Lighting Handbook


There is a myth that has been viral since before the dawn of digital video. The myth goes something like this: since cameras are so sophisticated today, and so light sensitive, and since you can fix anything in post-production, the lighting doesn’t matter anymore in video. Don’t you believe it, though.
Consider a video picture, or any other picture for that matter, consists of three things:
a)•light,
b)•dark (absence of light) and
c)•color (tinted light).
That’s all a picture is, just light. To say the lighting is irrelevant is to deny the artist a vital - and powerful communications tool.
Cameras today are incredibly sophisticated and light sensitive, and can yield exceptionally beautiful pictures with available light.
Because Manhattan is an urban environment, most available light indoors stinks for video. Typically, the light is from directly above, causing glowing foreheads and deep, dark eye sockets. Without supplemental lighting, your location videos can look pretty grim.
In nature available light can be fickle, and can change in an instant. This is why movie crews that you see on the street have huge lights set up in broad daylight – if the sun goes away, they can bring it back with a 50,000 watts and an amber gel.

Three point light attempts to simulate the three-dimensional world on a two-dimensional medium, such as a canvas, a photo print, a movie or video screen. It is the basis of all film television and photography lighting. The fundamentals of three-point light are evident in many renaissance-era paintings (and in some earlier examples from ancient Rome, Greece and Egypt.) The ‘masters of light’: Vermeer, Caravaggio, DaVinci, etc. understood how capturing the light could make an image pop right out of a canvas with dramatic realism, and how light could bring their often plain-looking subjects to life.

Remember, there is no one-size-fits-every-situation solution or formula, just general principles and guidelines. Every shoot is different, every face is different, and therefore every lighting situation is unique. The way a scene is lit can sometimes communicate as much as the dialogue - often this is the case in both Hollywood drama and daytime television drama.
The image captured by the camera is influenced by not only the lights but also by the camera’s iris, shutter speed, gain settings, etc. here’s a quick and dirty guide to where to set them:
• Iris: close down the iris until all of the faces in the frame are not overexposed. When in doubt, underexpose a little.
• Shutter Speed: always at 60, unless you are shooting a hockey game.
• Gain: should be as low as possible, as more gain adds grain and degrades colors (0db is normal, +16db is high). Low gain requires more light. As in nature and traditional photography, more light results in more vivid colors (this is why painters want a studio with great light). Many videographers prefer to shoot at -3db to get extra-stable color.
• White Balance: always set the white balance to the light that is falling on the subject’s face. I sometimes use the presets, tungsten or fluorescent, when appropriate.


Key Light: main light that falls on a subject. Key light is sometimes the strongest light source, but by definition it must be stronger than the fill light. The key light is the one that sets the character of the lighting design. This is the light that will literally highlight your subject’s features. Often key light is used for dramatic effect; for instance a key light from below gives an unnatural, mysterious or other-worldly look and has been utilized in crime, horror and fantasy films since the silent era.
A key light is typically hung approximately 30 degrees above the subject’s eye level, and anywhere from ten degrees to 90 degrees to one side (though thirty degrees off axis is a typical portrait lighting setup).
A key light needs to be somewhere off-axis with the camera, otherwise the light becomes very flat, with harsh shadows right under the nose and chin, similar to flash-photo lighting.
When possible, the light source is controlled with barn doors, which can help put light exclusively on your subject, and can keep light off any walls or objects in the background.
A key light can be focused light directly from the lamp or instrument, but portrait and video lighting often employs diffusion, reflected light, and bounced light to spread the light source, resulting in a ‘softer’ light falling on the subject.
Diffusion is achieved with frosted gels or ‘spun’ fabric gels attached to the instrument’s barn doors with wooden clothespins. These gels will cut down the effective light being delivered to the subject. Each gel has a value such as 1/8, ¼ or ½, referring to the amount of light the gel can be expected to lose.
Reflected light is usually achieved with umbrellas or other specialized reflectors. Umbrellas, because of their parabolic shape, focus the reflected light on a subject. Lowell lights are built with a mount for their ultra-lightweight umbrellas.
Folding reflectors, typically 12” to 36” discs with changeable lightweight skins that can be reversed, for varying degrees and qualities of reflection.
Bounced light is achieved with a large white card (usually foam core or ‘gatorboard’) or by merely aiming the light at a white wall or ceiling. This gives an exceptionally flat or even lighting to an entire room (though without the ability to really control where the light falls – it falls everywhere!
This method is particularly effective in small rooms where setting up three light stands would be impossible.)

Fill Light: this light, coming from a different angle, will fill in the dark shadows in the areas not covered by the key light. The fill light is by definition somewhat weaker than the key light, and a lower-wattage instrument may be used. For a portrait or beauty shoot, the fill light is typically positioned somewhat lower than the key light, anywhere from eye level to about twenty degrees above. The fill also needs to be on the opposite side of the key light; if the key is on the right, the fill needs to be on the left.
Colored gels can add subtle effects when used on fill lights.

Back Light: this is the light that falls on the subject’s hair and shoulders, and is important in giving a two-dimensional television picture a pronounced third dimension. Backlight is also frequently used to accent hair. When a subject with black hair is wearing a black suit against a black curtain, backlight will separate Roy Orbison’s hair and suit from the curtain.
The Backlight is typically at a forty-five degree angle above the subject’s head. Fashion shoots sometimes position a backlight directly in back of a model, below the head, to give a dramatic halo to a hairstyle.
Colored gels on backlights are effective tools in setting mood. Blue is often used to simulate moonlight (even though moonlight is actually more sepia colored); other gels can simulate sunlight or urban streetlamps.

Monday, October 05, 2009


Monday, August 31, 2009

how many lights are safe?

here is a link to a handy calculator which will tell you if you are overloading a circuit on location.
to use it, change the calculate option to "Breaker size", then total the wattage rating of all the lights - for instance, if you are using four 500-watt lights your total is 2000 watts.
the result: Recommended breaker size: 20 A (20 Amps)
(this is only a picture of the calculator - the real one can be found here )

remember, if you blow out a circuit breaker or fuse - can you get to it to reset the breaker or replace the fuse?
if not, you won't have electricity for that light anymore.
EVEN WORSE, the breaker could fail to protect the circuit, and you could burn the building down.
don't do that.

Thursday, August 20, 2009

Three Point Lighting Seminar Notes


There is a myth that has been viral since before the dawn of digital video. The myth goes something like this: since cameras are so sophisticated today, and so light sensitive, and since you can fix anything in post-production, the lighting doesn’t matter anymore in video. Don’t you believe it, though.
Consider a video picture, or any other picture for that matter, consists of three things:
a)•light,
b)•dark (absence of light) and
c)•color (tinted light).
That’s all a picture is, just light. To say the lighting is irrelevant is to deny the artist a vital - and powerful communications tool.
Cameras today are incredibly sophisticated and light sensitive, and can yield exceptionally beautiful pictures with available light.
Because Manhattan is an urban environment, most available light indoors stinks for video. Typically, the light is from directly above, causing glowing foreheads and deep, dark eye sockets. Without supplemental lighting, your location videos can look pretty grim.
In nature available light can be fickle, and can change in an instant. This is why movie crews that you see on the street have huge lights set up in broad daylight – if the sun goes away, they can bring it back with a 50,000 watts and an amber gel.

Three point light attempts to simulate the three-dimensional world on a two-dimensional medium, such as a canvas, a photo print, a movie or video screen. It is the basis of all film television and photography lighting. The fundamentals of three-point light are evident in many renaissance-era paintings (and in some earlier examples from ancient Rome, Greece and Egypt.) The ‘masters of light’: Vermeer, Caravaggio, DaVinci, etc. understood how capturing the light could make an image pop right out of a canvas with dramatic realism, and how light could bring their often plain-looking subjects to life.

Remember, there is no one-size-fits-every-situation solution or formula, just general principles and guidelines. Every shoot is different, every face is different, and therefore every lighting situation is unique. The way a scene is lit can sometimes communicate as much as the dialogue - often this is the case in both Hollywood drama and daytime television drama.
The image captured by the camera is influenced by not only the lights but also by the camera’s iris, shutter speed, gain settings, etc. here’s a quick and dirty guide to where to set them:
• Iris: close down the iris until all of the faces in the frame are not overexposed. When in doubt, underexpose a little.
• Shutter Speed: always at 60, unless you are shooting a hockey game.
• Gain: should be as low as possible, as more gain adds grain and degrades colors (0db is normal, +16db is high). Low gain requires more light. As in nature and traditional photography, more light results in more vivid colors (this is why painters want a studio with great light). Many videographers prefer to shoot at -3db to get extra-stable color.
• White Balance: always set the white balance to the light that is falling on the subject’s face. I sometimes use the presets, tungsten or fluorescent, when appropriate.


Key Light: main light that falls on a subject. Key light is sometimes the strongest light source, but by definition it must be stronger than the fill light. The key light is the one that sets the character of the lighting design. This is the light that will literally highlight your subject’s features. Often key light is used for dramatic effect; for instance a key light from below gives an unnatural, mysterious or other-worldly look and has been utilized in crime, horror and fantasy films since the silent era.
A key light is typically hung approximately 30 degrees above the subject’s eye level, and anywhere from ten degrees to 90 degrees to one side (though thirty degrees off axis is a typical portrait lighting setup).
A key light needs to be somewhere off-axis with the camera, otherwise the light becomes very flat, with harsh shadows right under the nose and chin, similar to flash-photo lighting.
When possible, the light source is controlled with barn doors, which can help put light exclusively on your subject, and can keep light off any walls or objects in the background.
A key light can be focused light directly from the lamp or instrument, but portrait and video lighting often employs diffusion, reflected light, and bounced light to spread the light source, resulting in a ‘softer’ light falling on the subject.
Diffusion is achieved with frosted gels or ‘spun’ fabric gels attached to the instrument’s barn doors with wooden clothespins. These gels will cut down the effective light being delivered to the subject. Each gel has a value such as 1/8, ¼ or ½, referring to the amount of light the gel can be expected to lose.
Reflected light is usually achieved with umbrellas or other specialized reflectors. Umbrellas, because of their parabolic shape, focus the reflected light on a subject. Lowell lights are built with a mount for their ultra-lightweight umbrellas.
Folding reflectors, typically 12” to 36” discs with changeable lightweight skins that can be reversed, for varying degrees and qualities of reflection.
Bounced light is achieved with a large white card (usually foam core or ‘gatorboard’) or by merely aiming the light at a white wall or ceiling. This gives an exceptionally flat or even lighting to an entire room (though without the ability to really control where the light falls – it falls everywhere!
This method is particularly effective in small rooms where setting up three light stands would be impossible.)

Fill Light: this light, coming from a different angle, will fill in the dark shadows in the areas not covered by the key light. The fill light is by definition somewhat weaker than the key light, and a lower-wattage instrument may be used. For a portrait or beauty shoot, the fill light is typically positioned somewhat lower than the key light, anywhere from eye level to about twenty degrees above. The fill also needs to be on the opposite side of the key light; if the key is on the right, the fill needs to be on the left.
Colored gels can add subtle effects when used on fill lights.

Back Light: this is the light that falls on the subject’s hair and shoulders, and is important in giving a two-dimensional television picture a pronounced third dimension. Backlight is also frequently used to accent hair. When a subject with black hair is wearing a black suit against a black curtain, backlight will separate Roy Orbison’s hair and suit from the curtain.
The Backlight is typically at a forty-five degree angle above the subject’s head. Fashion shoots sometimes position a backlight directly in back of a model, below the head, to give a dramatic halo to a hairstyle.
Colored gels on backlights are effective tools in setting mood. Blue is often used to simulate moonlight (even though moonlight is actually more sepia colored); other gels can simulate sunlight or urban streetlamps.

Wednesday, August 19, 2009

3 Point Light Seminar August 19, 2009

click here for arri book

Thursday, December 13, 2007

Photoshop Notes - and lack of same

.i was dizzy last night when i gave the Photoshop Basics seminar. i promised you all that i would post notes from the seminar. i realized after the seminar - there are no notes to give, except for a brief outline lacking any real instruction, which i have included below. i have also included the slides from the Powerpoint Presentation. (click for full size image.)
here's the notes that i worked from, and a much better option below for those desiring a full tutorial...
Photoshop can do virtually anything to an image; can be time consuming needn’t be.
can great results quickly, hope to show tonight. Photoshop’s the professional standard, been around the longest,
most stable, best known, most widely accepted, most widely available image application.
used for everything: school projects to high-end photography, art, advertising, hollywood, even scientific analysis.
can change color, brightness, contrast, soften, sharpen or add texture to all or part of an image; enlarge, convert, distort, flip an image, combine multiple images together, multiply a single image, can cut and paste, squash, stretch, and turn an image inside out .

define a pixel – Photoshop manipulates these pixels.
how big should you work: big!
res 72dpi screen, 300-1200 dpi print.
open new is rare – usually opening an existing file.
how to grab an image off the web
always work rgb –if not, change: mode

• opening/creating an image: what size/ what resolution/ what dpi?
• always rgb/ converting non-rgb images
• navigator
• working with layers/ always work on duplicate layers
• save vs. save as/jpeg vs. psd
• picture adjustments: levels/ auto levels, hue/ saturation, variations
• selection tools/ multiple tool choice
• magic wand tool
• feathering a selection
• cut, paste, eraser tool
• clone stamp tool
• color picker
• foreground/ background color
• filters


an application such as Photoshop is impossible to express is simply words. until i have time to develop something with illustrations, i have a link to an online tutorial. this one seems a bit plodding and tedious (with lots of ads - this is a link to a commercial website) but it has many illustrations and step by step instructions. you can find the tutorial, and many others here.

Friday, November 16, 2007

new photoshop seminars added

Monday, May 21, 2007

we wuz surveilled


in the release of the NYPD’s 600 pages documenting surveillance of individuals and groups prior to the Repug Convention in 2004, not only is MNN listed, but also our beloved Youth Channel.
The PD’s “Cyber Intellegence Unit” warns about “DAILY COVERAGE OF ANTI RNC PROTESTS ACTION ON MANHATTAN PUBLIC ACCESS CABLE TELEVISION NETWORK”.
many of us working at MNN (and many volunteers) helped to produce this programming. nice to see that someone was watching.
the fine people at i-witness video have a searchable database of the docs where you can see if you were watched as well.
big thanks to YC’s Andrew Lynn for this tip.

Wednesday, March 28, 2007

free seminar in the open studio

Monday, September 25, 2006

TV 81 THIS YEAR

The medium of television marks a milestone in 2006: its 81st birthday.
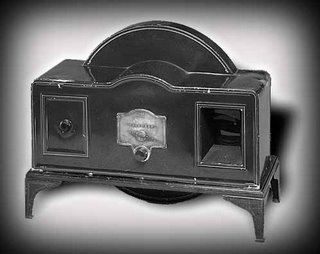
Late in 1925, a failed Scottish inventor working alone in a tiny London attic apartment developed the first practical television system (read: it worked). Few recognize the name John Logie Baird, but he was the first to demonstrate a working television system - camera, transmitter, and receiver/display.

Two years later he was making video recordings that can be viewed today.
Television had been speculated about since the mid 1800’s, decades before actual motion pictures or radio. In 1886, one Paul Nipkow, who apparently did little follow up on his Nipkow Disk, patented this key element in Berlin. The disk was further developed into an accurate scanning device, so that facsimiles of documents (faxes) could be transmitted from city to city - hundreds per hour to Paris offices by 1900. In Wales, mug shots and sketches of suspects were being sent ‘wireless’ to remote police stations by 1912.
But the triple problem of capturing live movement (camera), sending that dynamic image electronically (transmitter), and reproducing that moving image (‘TV set’) had never quite been solved when Baird decided to tackle the problem.
Baird was an inventor with no formal training as a scientist, tech school rather than university educated. The research and development on his ‘Televisor’ was a solo job: no assistant, virtually no funding, no libratory, no support from the scientific or academic community and no affiliation with any institution.
He had a dubious track record as an experimenter. As head engineer at Glasgow, Scotland’s only power plant, he caused a blackout of the entire city when he sent a huge amount of electricity into a vat of wet cement. Instead of the diamonds he had attempted to synthesize, he got hot, wet cement - and a pink slip. Utilizing the mechanical scanning principle of the Nipkow Disk, Baird cobbled together a camera and receiver/display out of a hatbox, bike-lamp lenses, sealing wax, darning needles, neon lamps, light-sensitive selenium, and, for the unfortunate soul in front of the camera, unbearably bright hot lights.
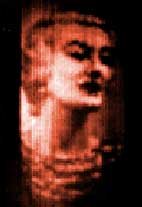
In October of 2006, eighty-one years will have passed since the first crude images of a ventriloquist’s dummy head appeared on Baird’s two-inch ‘screen’. The reddish image was composed of only 30 lines (interlaced!) and moved at 12 1/2 frames (25 fields) per second. Like video on the web today: crude but recognizable.
Baird demonstrated his system to the Royal Academy of Sciences in the spring of 1926. One of the distinguished gentlemen of the Academy caught his beard in the spinning disk apparatus. Eager to market his idea, Baird had regular demonstrations of his system in London’s Selfridges’s department store by year’s end.
Baird negotiated with the BBC, then Britain’s only broadcaster, to lease their radio transmitter’s time after midnight to test television reception. (Yes, public-access fans: the first television broadcasts ever were a leased-access affair!) Later, the Beeb would use his system for their first (pre-1936) TV standard.
Between 1926 and 1933, Baird would invent practical, working systems of almost every video device we know and love today. Color, ‘high’(er)- definition, three-dimensional video, infrared video, video projection, videodisks, home videodisk recorders, film to video transfers: all were successfully developed, demonstrated - and even marketed - by Baird. A London theatre was projecting color video of live horse races broadcast from the provinces. Selfridges’s even sold Baird home videodisk recorders in the early 1930’s.
So: why have you never heard of this John Logie Baird, alleged inventor of the most profound and pervasive communication technology in the history of mankind? Baird, for all his accomplishments, relied on a mechanical - not electronic – TV system. The spinning disks and pulsing lights of the system limited the amount of resolution, or detail, that could be reproduced. As rival electronic systems improved in the mid 1930’s, Baird was forced to buy into competing technologies.
Before his death in 1946, Baird had adopted an electronic scanning system, and had filed patents for true high-definition television, scanning up to 1,700 lines vertical (today’s HDTV is a mere 1,125 lines).
Some of Baird’s accomplishments would not be duplicated for decades. Incredibly, his legacy includes real video recordings from as early as 1927. Actual restored video from these disks can be viewed online at www.tvdawn.com. A wiggly home video recording from 1933 is also on display.
Many names are mentioned as ‘the inventor of television’. John Logie Baird was the first to get a picture, and the first to realize television as a flexible, multipurpose medium.

(30-30-30)

© 2006 Richard Speziale All Rights Reserved

Friday, September 08, 2006

mnn studio clip: RUDIE CREW

the brilliant RUDIE CREW in mnn studio 2 this summer


=======================================================================

Tuesday, September 05, 2006

*best* location shoot checklist on the internets

Location... Location... Location...

Any film or video production can be a logistical challenge- the more ambitious the project, the tighter the budget, the shorter the schedule, the more challenging it will get. The key is to be prepared, to know your priorities, and be flexible.
Location shoots- those outside the walls of a controlled studio environment- are usually the most challenging. Fate has a way of throwing up obstacles. These obstacles can often ruin a shot or scene, sour the mood of the talent and crew, and- at worst- cripple your artistic vision, which will seem more and more elusive as the obstacles mount.
On location, reality happens. Your crew is human, your equipment is fallible, and the real world is harsh and unforgiving, not to mention noisy.
Production is hard work in the best of circumstances- it can be hell in the worst. The better prepared you are to deal with reality, the smoother your production will go- and the better your finished product will be.

Particularly with low or no budget shoots, efficiency is the key to shooting- and ultimately, to completing a project. Your talent and crew, who you are probably paying little or nothing, need to know that they are part of a successful venture. (Volunteers have a way of evaporating when they sense that they are on a sinking ship.)
What follows is an incomplete checklist for dealing with some of the common obstacles you are likely to encounter in the field. Some of these items may seem superfluous- until, of course, you need them. Remember: that setup that was supposed to take five minutes can take you to the early morning hours.

NOTE: These tips are designed for a dramatic, narrative short or feature, but are just as valid and useful for a documentary, informational, or episodic television production. Yeah, even a music video. Them too.

PRE-PRODUCTION BRIEF:
* Buy fresh film or tape stock, and plenty of fresh batteries. Buy from an outlet that sells tons of the stuff (easy in Manhattan). Not only will you pay less, but you will ensure that you don't get tapes that have been sitting in a hot warehouse all summer. (The local appliance store is NOT where you should buy the camera original tapes for your masterpiece.)
* If shooting on the street or in other public places, it is a good idea to get a film permit from the Mayor's Office of Film, Theater, and Broadcasting. (www.ci.nyc.ny.us/html/filmcom/home.html) Though the police are sometimes tolerant, they don't have to be, and will either tell you to pack up, or they can confiscate your gear- particularly if you're blocking the sidewalk. The insurance necessary to get the permit will protect you from any idiot on the street from suing you. HINT- a camera on a monopod doesn't count as putting gear on the street, it's still technically a hand held camera- it's good for quick scenes without prior arrangements; BUT: if an officer asks you to move on, by all means, graciously do so.
* Go over the script carefully with all involved- make sure your intent is clear. (If not, you may end up with a production team that is making several different films!)
* Know the script better than the talent. If they have questions, you, the director, will need to have an answer.
* Storyboard every setup and scene- this will communicate to cast and crew what they are expected to produce visually, and saves gobs of time and lots of explaining on the set. You will need your voice for other matters. (Can't draw a storyboard? Get somebody who can. If you can't get it on a piece of paper, how do you expect to get it in the camera?)
* Rehearse in the space that you will be shooting in, with camera, sound, and lighting people present. This is more for your benefit than for the talent's.
* Test ALL equipment, including cables, before you take it to the location. (I promise you will have plenty of surprises when you get there, and you don't need one involving a vital piece of gear.)
* Have money in the bank, or a good credit card. There's always something that will cost, and you, the director, will have to lay out for it. (You didn't think this was going to be cheap, did you?)
* Get the number of a local deli or restaurant and find out how late they will deliver. Find out if anyone on the set is a vegetarian or vegan, and accommodate him or her. Don't expect your crew to perform late into the day on chicken McNuggets and warm cola...
* Have the number of a local car service or two. Never send your people to the subway at 2a.m - especially if you want them back on the set later that morning. Make arrangements clear to all ahead of time
* Type up a sheet with everybody's number, and the director or producer's cell phone that will be on the set, and make several copies.

* Never make assumptions about power on location. Will the outlets you expect to use handle the lights? If you're not sure, get someone who has experience with electricity! If the fuses or breakers blow, do you have access to them? Do you have spare fuses? If you need to run the camera on batteries, how long can you expect to run it? It pays to have answers to these questions before you show up.
* Have plenty of grounded extension cords, and don't overload them. (See Above.)
* Bring extra XLR cables for microphones.
* Batteries for camera, batteries for mixers, mics, cell phones, everything. You always need more batteries.
* Bring several pairs of work gloves.
* Always, always monitor the sound with comfortable headphones. (ADR- dialog replacement- is only possible in a studio designed for this purpose, and can cost more than re-shooting the entire scene!)
* Magic Markers, Sharpies, pens, pads, clipboards, and Post-Its.
* A cell phone that everybody on the crew has the number of, and of course an extra battery and a charger. Some phones can double as walkie-talkies; these can be very handy! (Don't forget to mute all phones when shooting.)
* Large Zip lock baggies.
* A Polaroid camera (or digital camera and printer) is essential for continuity, even on one-day shoots. Never rewind a master tape to see how a curtain was placed- takes too long, and adds wear and tear to a tape that took hours of trouble to shoot. (Continuity is somewhat overrated, but when you ignore it, you run the risk of unintended comedy on the screen.)
* Hair spray and/ or frosting spray for dulling chrome objects that reflect too much light.
* Are there windows at the location? Bring large enough 'tungsten' gels to balance the daylight coming in to the lights you bring (or conversely, 'daylight' filters for the lights. Use this method if there are big windows and lots of natural light.)
* Assortments of different colored gels always prove useful, and are nothing to carry.
* Wooden clothespins to clamp the gels to the 'barn doors' on the lights.
* Of course, a fresh roll of gaffer tape and/or even sandbags to secure those hot, dangerous lights.
* Gaffer tape, black drafting tape, strong two-sided adhesive tape.
* A phone card and a credit card.
* A roll of quarters for the pay phone.
* A large flashlight, one or more small 'tech' flashlights.
* A small bag with the following: Safety pins (different sizes), cloth surgical tape (for attaching mic cables to a jacket or the talent's skin), light plastic surgical tape (for attaching mic cables to a delicate silk blouse - test it first!), deluxe 'Leatherman' all-in-one tool (pliers, screwdriver, etc), metal binder clips (different sizes - don't use these on lights, unless you like getting blisters), a sharp knife, an exacto knife, strong black thread, strong, non-rigid picture hanging wire, and a mini sewing kit: these are some of the items that you would find in a prop person's 'bag of tricks'; any of these could save a scene- and could take hours to track down when you need one.)
* A basic first aid kit. Uncontrolled bleeding can bring an entire production to a standstill.
Got everything? Good. Break your legs.

©2006 Richard Speziale All Rights Reserved.